If you have an Instant Pot, you may have encountered the burn message at some point. This is a safety feature that detects when the inner pot has gotten too hot and warns you to stop cooking. But what causes the burn message and how can you fix it? In this guide, we will explain what the burn message means, how to troubleshoot it, and how to prevent it from happening again.
Understanding the Burn Message
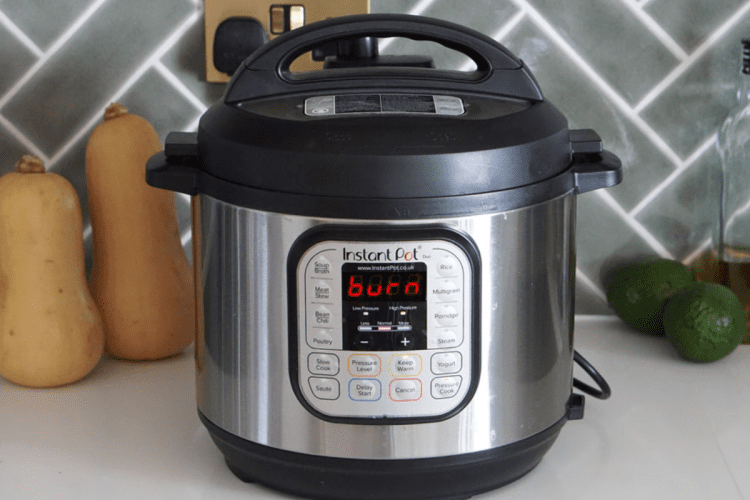
What is the Burn Message?
The burn message is a notification that appears on your Instant Pot screen when the internal temperature of the pot reaches a certain level. It indicates that food may be starting to burn on the bottom of the pot and that you should stop cooking immediately. The burn message is not an error code, but rather a cautionary sign that something is wrong.
When Does it Typically Occur?
The burn message typically occurs when one or more of the following factors are present:
- Not enough liquid in the pot
- Sugary or dairy-based sauces
- Sauté function used before pressure cooking
- Lid not sealed properly
- Food being too dry or thick
These factors can cause the pot to overheat and reach high temperatures, which can damage your food and your appliance.
Troubleshooting the Burn Message
If you see a burn message on your Instant Pot screen, don’t panic! There are some simple steps you can take to fix it and resume cooking safely.
Adjusting Liquid Levels
One of the most common causes of the burn message is not having enough liquid in your pot. Instant Pots rely on water-based liquid to pressurize properly and if there is not enough liquid, they will start to overheat. To prevent this from happening, make sure you fill your pot with enough liquid according to your recipe instructions. You can also use water as a substitute for some ingredients if they are too dry or thick.
Deglazing the Pot
Another possible cause of the burn message is having sugary or dairy-based sauces in your pot. These sauces can caramelize and increase the temperature of the bottom of the pot, especially if they are thickened with cornstarch or flour. To avoid this problem, deglaze your pot by scraping up any browned bits from the bottom with a wooden spoon before adding more liquid or food. You can also add some water or broth to thin out any thickened sauces.
Monitoring Thickness and Density
A third factor that can trigger the burn message is using sauté function before pressure cooking. The sauté function heats up more than pressure cooking and can raise the temperature of your pot faster than normal. This can happen if you use less liquid than usual or if you cook food for too long on low heat before switching to high pressure. To prevent this from happening, make sure you use enough liquid for sautéing and don’t overcook food on low heat for too long.
Tips for Preventing the Burn Message
If you want to avoid getting burned messages in future recipes, here are some tips to keep in mind:
- Use enough liquid in your pot according to your recipe instructions.
- Use non-sugary liquids for sauces and thin them out with water or broth if needed.
- Let your Instant Pot cool off between functions before switching from sautéing to pressure cooking.
- Make sure your lid is sealed tight and no steam or liquid is sputtering from it.
- Use non-stick pots-in-pots method for thicker foods like rice or pasta.
- Prepare ingredients properly by rinsing them well before adding them to your pot.
How to Check the Temperature of the Inner Pot Before and During Cooking
One of the best ways to prevent the burn message is to monitor the temperature of your inner pot before and during cooking. This will help you avoid overcooking or undercooking your food, which can cause it to burn or become dry.
To check the temperature of your inner pot, you will need a thermometer that can measure high temperatures. You can use an instant-read thermometer, a digital probe thermometer, or a sous vide thermometer. Make sure you insert the thermometer into the thickest part of your food, such as the center of a steak or the middle of a chicken breast.
Here are some steps to follow:
- Before cooking, fill your Instant Pot with enough liquid according to your recipe instructions. You can also add some water or broth if needed.
- Place your food in the inner pot and close the lid securely. Make sure there are no gaps between the lid and the pot.
- Plug in your Instant Pot and turn it on. Select pressure cook or manual mode on your control panel.
- Wait for your Instant Pot to reach pressure and then start cooking time. You can use a timer or an app to keep track of time.
- While cooking, check the temperature of your inner pot periodically using a thermometer. You can do this by opening one valve slightly (about 1/4 turn) and inserting the thermometer into the liquid without touching any metal parts. This will allow some steam to escape but not enough to affect pressure or temperature.
- If you see that your inner pot is getting too hot, close one valve completely (about 1/2 turn) and wait for 10 minutes before checking again. This will reduce heat loss and maintain pressure.
- If you see that your inner pot is getting too cold, open one valve slightly (about 1/4 turn) and wait for 10 minutes before checking again. This will increase heat transfer and raise pressure.
- If you see that your inner pot is within safe temperature range (usually between 160°F and 180°F), continue cooking until done. If you see that your inner pot is above safe temperature range (usually above 200°F), stop cooking immediately and cancel any remaining time by pressing cancel button on your screen then release any remaining pressure by turning valve knob counterclockwise until it stops then wait until all steam has escaped then carefully remove lid then check food for doneness then discard any burnt parts then continue cooking as normal.
By following these steps, you can ensure that your food is cooked evenly and safely in your Instant Pot without burning it on the bottom.
How to Adjust the Pressure Level and Cooking Time According to the Recipe
One of the most important factors that affect the quality and safety of your food in your Instant Pot is the pressure level and cooking time. Different recipes have different requirements for these parameters, depending on the type, size, and texture of the food you are cooking. If you adjust them incorrectly, you may end up with overcooked, undercooked, or burnt food.
To adjust the pressure level and cooking time according to the recipe, you will need to follow these steps:
- Before cooking, read your recipe carefully and note down the ingredients, quantities, and instructions. Make sure you have all the necessary tools and equipment ready, such as measuring cups and spoons, knives, cutting boards, etc.
- Plug in your Instant Pot and turn it on. Select pressure cook or manual mode on your control panel.
- Place your food in the inner pot according to your recipe instructions. Leave some space between the food pieces for even cooking. Close the lid securely and make sure there are no gaps between the lid and the pot.
- Add enough liquid to cover your food completely. You can use water or broth as a base liquid for most recipes. You can also add some seasonings or aromatics if desired.
- Set your pressure level according to your recipe instructions. Most recipes use high pressure (10 to 12 psi) for faster cooking times (15 to 25 minutes). However, some recipes may require low pressure (5.5 to 7 psi) for more delicate foods like eggs or cheesecakes1. You can check your owner’s manual for specific psi settings for your model2.
- Set your cooking time according to your recipe instructions. Some recipes may have a specific time range for different types of food or different stages of doneness. For example, some recipes may instruct you to start with a shorter time (10 minutes) and then increase it by 5 minutes if needed3. You can also use a timer or an app to keep track of time.
- While waiting for your food to cook, monitor it periodically using a thermometer if needed. You can also check if there is any sputtering or bubbling from the steam valve or any hissing from the venting valve. These are signs that indicate that pressure is building up inside your Instant Pot.
- When your cooking time is up, let some natural pressure release before opening the lid. This will allow some steam to escape but not enough to affect temperature or texture. Wait until all steam has escaped before carefully removing lid then check food for doneness then discard any burnt parts then continue cooking as normal.
- By following these steps, you can ensure that you adjust the pressure level and cooking time according to each recipe correctly and enjoy delicious meals in your Instant Pot.
FAQs
What does the burn message mean?
The burn message means that the internal temperature of the pot has reached a certain level that indicates that food may be starting to burn on the bottom of the pot. It is a safety feature that warns you to stop cooking and check your food.
How do I fix the burn message?
To fix the burn message, you need to cancel any remaining cooking time, release any remaining pressure, remove the lid, and check your food for doneness. You may need to discard any burnt parts and add more liquid or thin out any thick sauces. You can then resume cooking as normal.
How do I prevent the burn message from happening again?
To prevent the burn message from happening again, you need to follow these tips:
1. Use enough liquid in your pot according to your recipe instructions.
2. Use non-sugary liquids for sauces and thin them out with water or broth if needed.
3. Let your Instant Pot cool off between functions before switching from sautéing to pressure cooking.
4. Make sure your lid is sealed tight and no steam or liquid is sputtering from it.
5. Use non-stick pots-in-pots method for thicker foods like rice or pasta.
6. Prepare ingredients properly by rinsing them well before adding them to your pot.
What are some common culprits behind the burn message?
Some common culprits behind the burn message are:
1. Not enough liquid in the pot.
2. Sugary or dairy-based sauces.
3. Sauté function used before pressure cooking.
4. Lid not sealed properly.
5. Food being too dry or thick.
How do I check the temperature of the inner pot before and during cooking?
To check the temperature of the inner pot, you need to use a thermometer that can measure high temperatures. You can insert the thermometer into the liquid without touching any metal parts by opening one valve slightly. You can then adjust the valve to increase or decrease the pressure and temperature as needed.
Conclusion
The burn message on your Instant Pot screen is not an error code, but rather a safety feature that warns you when something is wrong with your cooking process. It means that food may be starting to burn on the bottom of your pot due to various factors such as not enough liquid, sugary sauces, sauté function used before pressure cooking, lid not sealed properly, or food being too dry or thick.
To fix it, simply cancel any remaining cooking time by pressing cancel button on your screen then release any remaining pressure by turning valve knob counterclockwise until it stops then wait until all steam has escaped then carefully remove lid then check food for doneness then discard any burnt parts then continue cooking as normal.
To prevent it from happening again, make sure you follow these tips:
- Use enough liquid in your pot according to your recipe instructions.
- Use non-sugary liquids for sauces and thin them out with water or broth if needed.
- Let your Instant Pot cool off between functions before switching from sautéing to pressure cooking.
- Make sure your lid is sealed tight and no steam or liquid is sputtering from it.
- Use non-stick pots-in-pots method for thicker foods like rice or pasta.
- Prepare ingredients properly by rins